Features
Custom Email Domain
Custom email domains allow you to send emails to your waitlist subscribers from your own domain, rather than the default Waitlister's domain. This creates a more professional appearance.
Custom email domains are available on the Growth plan.
Benefits of Custom Email Domains
Using a custom email domain for your waitlist communications offers many important advantages.
- Increased Trust: Recipients are more likely to open emails coming from a recognizable domain
- Professional Brand Image: Maintain brand consistency throughout the customer journey
- Better Sender Reputation: Build email sending reputation for your own domain
Getting Started
Adding Your Custom Email Domain
To set up a custom email domain:
- Navigate to your waitlist dashboard
- Click "Settings" in the sidebar navigation
- Scroll to the Domains > Email domain section
- Click "Add domain" or "Manage" to open the custom email domain modal
Domain Configuration
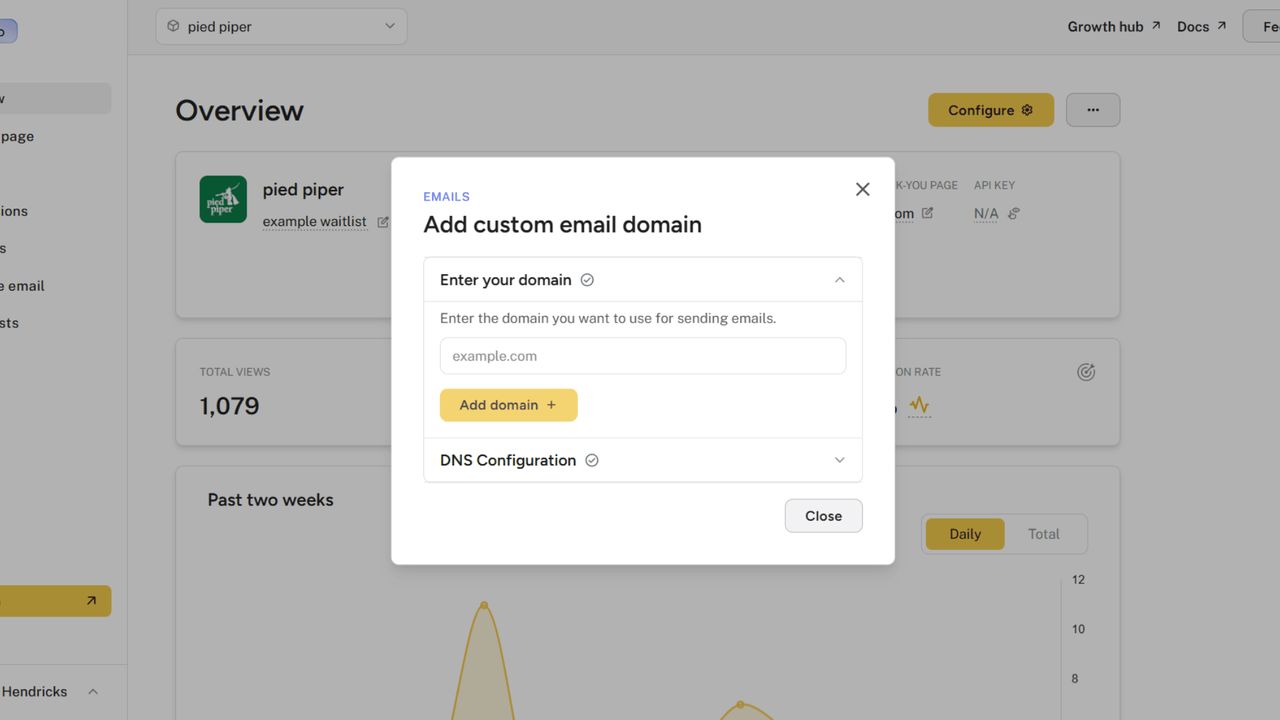
In the custom email domain modal, you'll see two main sections.
- Enter your domain: Where you input the domain you want to use for sending emails
- DNS Configuration: Where you'll find the DNS records needed to verify ownership and enable email sending
Step 1: Enter Your Domain
- Click the "Enter your domain" section to expand it
- Enter your domain name in the format
example.com(without "http://" or "www") - Click "Add domain"
If you're changing an existing domain, you'll see "Change domain" instead. Changing your domain will reset your existing DNS configuration.
Step 2: Configure DNS Records
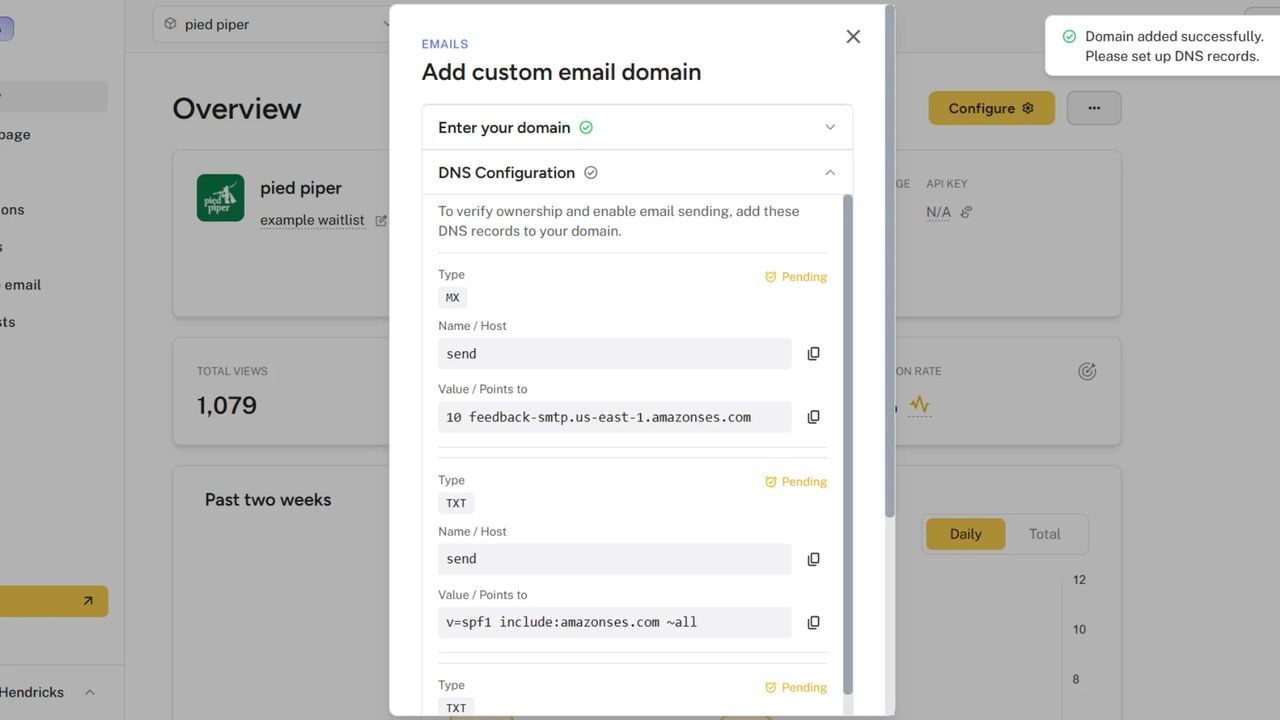
After adding your domain, the DNS Configuration section will become available:
- Click to expand the DNS Configuration section
- You'll see a list of DNS records that need to be added to your domain
- Each record shows the record type (TXT, MX), name/host, and value/points to
- Copy these values and add them to your domain's DNS settings at your domain provider
For each record, you can click the copy button to easily copy the value to your clipboard.
Step 3: Verify Your Configuration
After adding the DNS records at your domain provider:
- Click the "Verify setup" button in the DNS Configuration section
- Waitlister will initiate the verification process with our email provider
- Verification can take up to 48 hours to complete, though it often happens much faster
- You can click "Refresh status" to check if verification has completed
Once all records are verified, you'll see a confirmation message and your custom email domain will be ready to use.
Automatic Verification
Waitlister will also automatically check pending domains every 15 minutes. Once your DNS records are detected, your domain will be automatically verified and you'll receive an email confirmation.
Using Your Custom Email Domain
After your domain is verified, Waitlister automatically applies the following changes:
- Welcome Emails: Your welcome emails will now be sent from
yourname@yourdomain.cominstead ofyourname@waitlister.me - Email Broadcasts: When creating new broadcasts, your custom domain will be available as the sender domain
Managing Your Custom Email Domain
Viewing Domain Status
Check your domain status in Settings > Domains > Email domain:
- Verified: Domain is active and working
- Pending: DNS records not yet detected
- Failed: DNS configuration needs attention
Removing a Custom Email Domain
If you need to remove your custom email domain:
- Go to Settings > Domains > Email domain
- Click "Manage" to open the modal
- Click "Remove domain" at the bottom of the modal
- Confirm the removal when prompted
After removing a custom email domain, any draft broadcasts or welcome emails using that domain will automatically revert to using the default Waitlister's domain.
Troubleshooting
Verification Failures
If domain verification fails or takes longer than expected:
- Check Record Accuracy: Ensure all DNS records match exactly what's shown in the DNS Configuration section
- Wait Longer: DNS changes can take time to propagate (up to 48 hours)
- Check Priority Settings: Some records may require specific priority values
- Check Domain Provider Requirements: Some providers have specific formats for DNS entries
Email Delivery Issues
If you're experiencing issues with email delivery after verification.
- Check Spam Folders: Ask subscribers to check their spam folders
- Review Email Content: Ensure your email content is not triggering spam filters
- Verify All Records: Ensure all required DNS records are properly configured
Domain Provider-Specific Instructions
Different domain providers have slightly different interfaces for managing DNS records. Here are some general guidelines for popular providers.
General Steps
- Log in to your domain provider's account
- Navigate to the DNS management section (often called "DNS settings," "DNS records," or "Domain management")
- Look for an option to add new DNS records
- Add each record type with the corresponding Name/Host and Value/Points to
- Save your changes
For specific step-by-step instructions for your domain provider, please refer to their documentation or contact their support team.
Help and Support
Need assistance with custom email domains? We're here to help.
- Email Support: Contact us via the support page
- In-App Help: Access the "Help" page in your dashboard