Features
Custom Domain
Custom domains allow you to use your own domain name for your entire waitlist experience, creating a more professional and branded experience for your potential users.
Instead of sharing a generic Waitlister URL, you can present your waitlist on a domain that matches your brand identity.
Custom domains are available on the Growth plan and higher.
Benefits of Custom Domains
Using a custom domain for your waitlist has many advantages.
- Professional Appearance: Consistent branded experience from signup through confirmation
- Brand Recognition: Reinforce your brand with every link share
- Increased Trust: Build credibility with potential users through a branded domain
- SSL Certificate: Automatic HTTPS with a secure SSL certificate
Getting Started
Adding Your Custom Domain
To connect a custom domain to your waitlist:
- Navigate to your waitlist dashboard
- Click "Settings" in the sidebar navigation
- Scroll to the Domains > Page domain section
- Click "Add domain" or "Manage" to open the custom domain modal
Domain Configuration
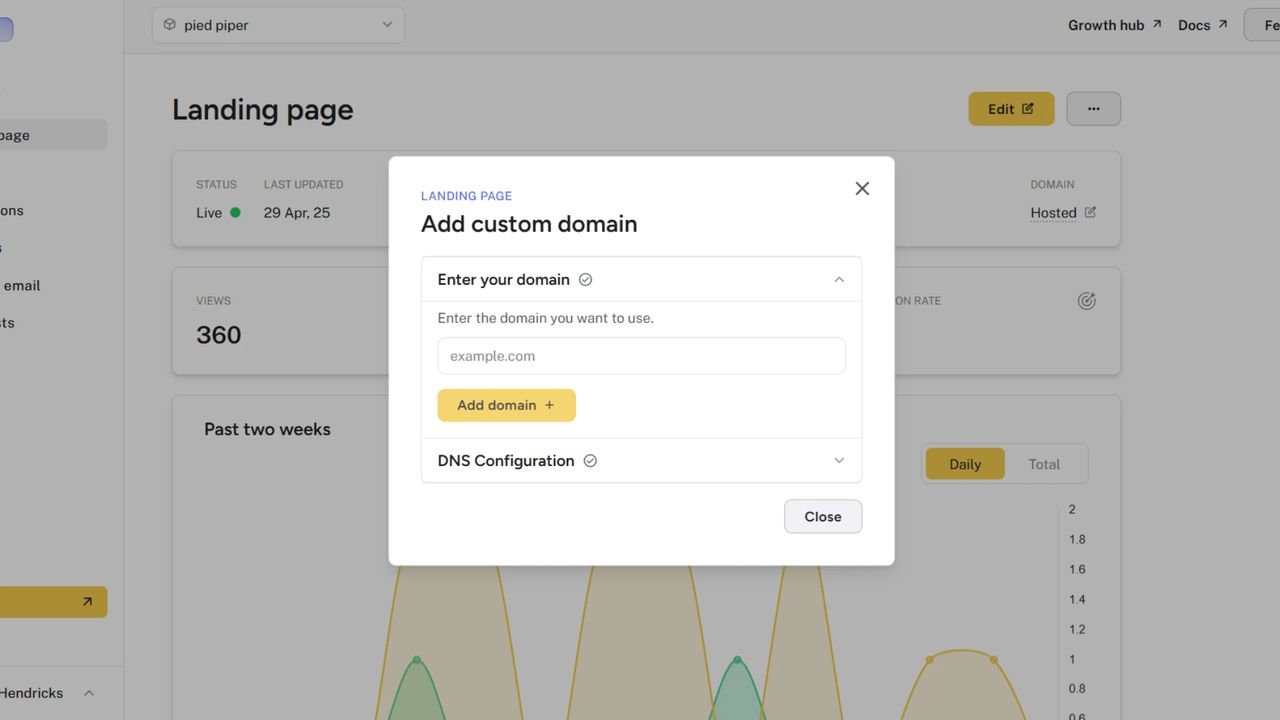
In the custom domain modal, you'll see two main sections.
- Enter your domain: Where you input the domain you want to use
- DNS Configuration: Where you'll find the DNS records needed to verify ownership
Step 1: Enter Your Domain
- Enter your domain name in the format you want to use:
- Root domain:
example.com - With www:
www.example.com - Subdomain:
waitlist.example.com - Do not include "http://" or "https://"
- Root domain:
- Click "Add domain"
If you're changing an existing domain, you'll see "Change domain" instead. Changing your domain will reset your existing DNS configuration.
Step 2: Configure DNS Records
After adding your domain, the DNS Configuration section will become available with the required records.
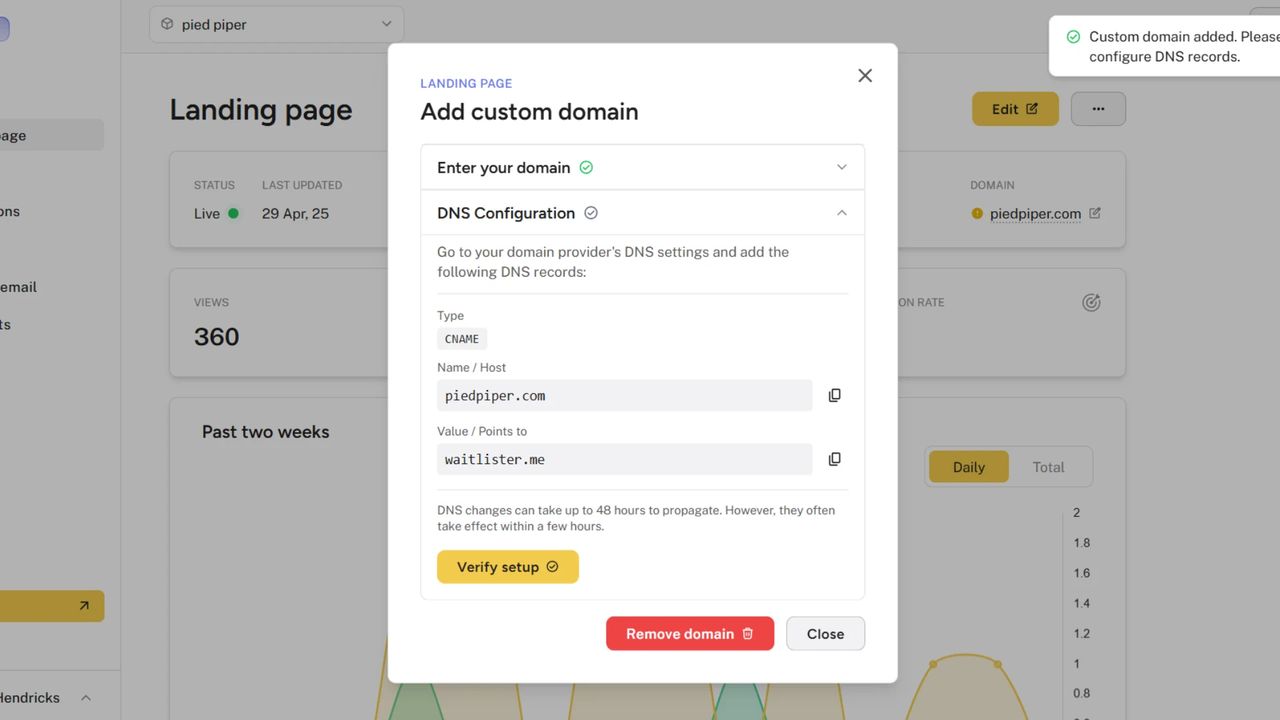
You'll need to add two DNS records.
1. CNAME Record (Points your domain to Waitlister)
- Type: CNAME
- Name/Host: Your full domain (e.g.,
waitlist.example.comor@for root) - Value/Points to:
[your-waitlist-slug].waitlister.me
This record directs traffic from your domain to your Waitlister page.
2. TXT Record (Verifies domain ownership)
- Type: TXT
- Name/Host: Your root domain (e.g.,
example.comor@) - Value:
waitlister-verification=...(unique token)
Important: The TXT record must be added to your root domain, even if you're using a subdomain.
Step 3: Add DNS Records at Your Provider
- Log in to your domain provider's account
- Navigate to DNS management section
- Add both the CNAME and TXT records with the exact values shown
- Save your changes
Each domain provider has a different interface. Look for sections labeled "DNS Settings," "DNS Records," "Advanced DNS," or "Domain Management."
Step 4: Verify Your Configuration
After adding the DNS records:
- Wait 5-15 minutes for initial propagation
- Click "Verify setup" in the DNS Configuration section
- Waitlister will check:
- TXT record at your root domain ✓
- CNAME record at your custom domain ✓
- SSL certificate status ✓
- If successful, your domain is now active!
DNS changes can take up to 48 hours to propagate fully, though they often work within a few hours. If verification fails, wait and try again later.
Automatic Verification
Waitlister will also automatically check pending domains every 15 minutes. Once your DNS records are detected, your domain will be automatically verified and you'll receive an email confirmation.
Using Your Custom Domain
Once your domain is verified:
What Uses Your Custom Domain
- Landing Page: Accessible at your custom domain (e.g.,
https://waitlist.example.com) - Thank-you Page: Success page after signup uses your domain
- Shared Links: All waitlist links use your custom domain by default
SSL Certificate
Your custom domain automatically gets a free SSL certificate, ensuring all traffic is secure with HTTPS. The SSL certificate is provisioned and renewed automatically by Cloudflare.
Managing Your Custom Domain
Viewing Domain Status
Check your domain status in Settings > Custom domain > Page domain:
- Verified: Domain is active and working
- Pending: DNS records not yet detected
- Failed: DNS configuration needs attention
Removing a Custom Domain
If you need to remove your custom domain:
- Go to Settings > Custom domain
- Click "Manage" to open the modal
- Click "Remove domain" at the bottom
- Confirm the removal
After removing a custom domain, your waitlist will revert to using the default Waitlister domain (waitlister.me/p/your-slug and waitlister.me/thank-you/...).
Troubleshooting
Verification Failures
If domain verification fails, check these common issues.
TXT Record Issues
Problem: "TXT record not found at root domain"
Solutions:
- Ensure the TXT record is added to your root domain (e.g.,
example.com), not your subdomain - For most providers, use
@as the hostname for root domain - Verify the TXT value matches exactly (copy/paste to avoid typos)
- Check if your provider requires quotes around the TXT value
CNAME Record Issues
Problem: "CNAME record not found or incorrect"
Solutions:
- Verify the CNAME points to the correct target shown in Waitlister
- Make sure there's no extra text or formatting
- Some providers don't allow CNAME on root domain (
example.com) - use a subdomain instead (e.g.,www.example.com) - Remove any existing A records that might conflict
DNS Propagation
Problem: "DNS records still not detected after adding them"
Solutions:
- Wait longer - DNS can take 5 minutes to 48 hours to propagate
- Clear your DNS cache:
ipconfig /flushdns(Windows) orsudo dscacheutil -flushcache(Mac) - Check DNS propagation at whatsmydns.net
- Try verification again after waiting
Provider-Specific Issues
Cloudflare Users:
- Make sure "Proxy status" is set to "DNS only" (gray cloud), not "Proxied" (orange cloud)
- Cloudflare's proxy can interfere with CNAME verification
GoDaddy Users:
- Don't include your domain name in the hostname field
- For
waitlist.example.com, just enterwaitlist - For root domain, use
@
Domain Already in Use
If you see "Domain already in use":
- Check if you've added this domain to another waitlist in your account
- Contact support if you believe the domain should be available
SSL Certificate Issues
If your domain verifies but shows SSL errors:
- Wait up to 60 minutes for SSL certificate provisioning
- Clear your browser cache
- Try accessing the site in incognito/private mode
- SSL certificates can take up to an hour to fully activate
Frequently Asked Questions
Can I use my root domain (example.com)?
Yes, but we recommend using a subdomain (e.g., waitlist.example.com or www.example.com) because:
- Some DNS providers don't support CNAME records on root domains
- It keeps your waitlist separate from your main website
- It's easier to manage and remove if needed
How long does DNS propagation take?
DNS changes typically propagate within:
- 5-15 minutes: Minimum time for changes to start appearing
- 1-4 hours: Most changes are visible globally
- 24-48 hours: Maximum time for full propagation worldwide
Can I change my custom domain?
Yes! Click "Change domain" in the custom domain settings. Note that:
- Your old domain will stop working immediately
- You'll need to configure DNS records for the new domain
- Existing links with the old domain will no longer work
What happens if my DNS records expire?
As long as you keep the DNS records active at your domain provider, your custom domain will continue working indefinitely. DNS records don't expire on their own.
Help and Support
Need assistance with custom domains? We're here to help.
- Email Support: Contact us via the support page
- In-App Help: Access the "Help" page in your dashboard