Waitlist
Form
The form builder lets you create customizable waitlist forms that you can embed on your own website. This guide explains how to create and customize your form.
Getting Started
Access the form builder from your waitlist dashboard by clicking "Form" in the navigation. If you haven't created a form yet, you'll see the option to create one.
The Editor
The form editor has three parts:
- Sidebar (left): switch between two tabs at the top:
- Theme — styling that applies to your whole form: template, layout, content alignment, background, padding, fonts, and border.
- Components — the elements you can add to your form. Drag one onto the form (or tap it on mobile) to add it.
- Canvas (center): a live preview of your form. Click any element to select it — its settings open in the sidebar, where you can edit its content and styling. Click an empty area of the canvas twice (double-click) or the back arrow in the panel to deselect.
- Toolbar (top): save status, Save, Preview, and Embed, plus Undo and Redo.
Undo and Redo
To reverse a change, use the undo and redo buttons in the toolbar, or the keyboard shortcuts:
- Undo:
Ctrl/Cmd + Z - Redo:
Ctrl/Cmd + Shift + Z
Layout Options
Your form can be structured in two ways:
- Single column: All elements stack vertically
- Double column: Elements are arranged in two columns
To change the layout:
- Open the Theme tab in the sidebar and find the Layout section
- Click either the single or double column icon
- Your form will automatically adjust
Content Alignment
You can align your form content in three ways.
- Left
- Center
- Right
This applies to all elements in your form.
Form Structure
Your form is built from various sections that you can add, remove, and reorder. Open the Components tab in the sidebar to see them all.
- Title: Headlines for your form
- Text: Paragraphs and descriptions
- Image: Add images to your form
- Email field: Email input for sign-ups (required)
- Name field: Optional name collection
- Phone number field: Optional phone number collection
- Custom field: Collect any extra information with your own field and label
- Submit button: Sign-up button (required)
- Check waitlist status: A link that lets visitors check their position
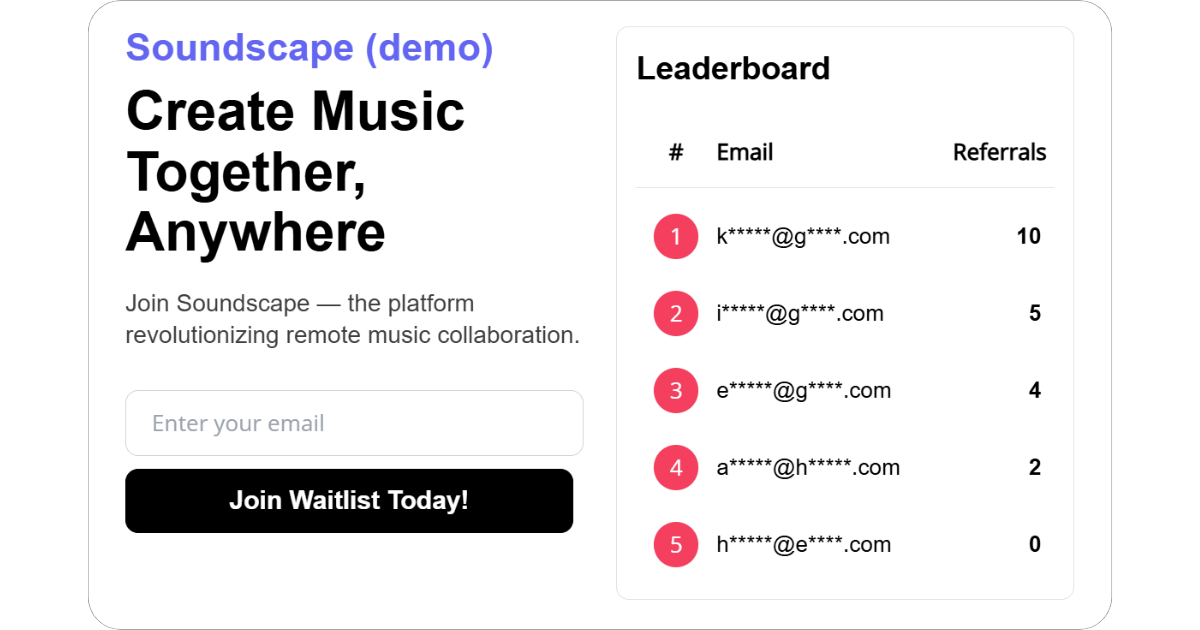
- Social proof: Display social proof with total subscriber count
- Subscriber goal: Show progress towards a sign-up goal
- Survey: Collect additional information with custom questions
- Leaderboard: Display top waitlist positions
- Countdown timer: Count down to your launch date
Customization Options
The settings below live in the Theme tab of the sidebar and apply to your whole form. To style an individual element instead — its colors, fonts, or content — select it on the canvas and use its settings panel (see Editing Sections).
Background
You can choose a background from four types.
- Transparent: Uses your website's background
- Solid color: Pick any color
- Gradient: Multiple colors with various patterns
- Image: Upload a custom background image
Padding
Adjust the space inside your form.
- Vertical padding: Space above and below content
- Horizontal padding: Space on left and right
- Values range from 0-100px
Typography
Set different fonts for:
- Titles: Headers and important text
- Body: Regular text and form fields
Changes apply to all sections.
Form Border
You can customize the look of your form's border.
- Border radius:
- None (0px)
- Small (8px)
- Medium (16px)
- Large (24px)
- Full (100px)
- Border color: Any color using the color picker
- Border width: 0-10px using the width controls
You can hide the border by setting the width to 0.
Working with Sections
Adding Sections
- Open the Components tab in the sidebar
- Drag the element you want into position on your form
- On mobile, tap an element in the sidebar to add it to your form
Editing Sections
Click any element on the form to select it. Its settings open in the sidebar, where you can edit both its content (text, placeholders, survey questions, and so on) and its styling (colors, fonts, border, spacing).
- Deselect by clicking the back arrow at the top of the settings panel, or by double-clicking an empty area of the canvas.
- Remove the selected element with the Delete button at the bottom of its settings panel.
Images
When an Image is selected, you can choose how it's sized in its settings panel:
- Full width (the default for new images): the image scales with the form so it fits any embed width. Use the width slider to set its size as a percentage.
- Turn Full width off to set a fixed pixel width instead.
Moving Sections
- Click and hold the drag handle on the left-hand side of a section
- Drag to reposition
- In double-column layout, you can drag between columns
Section Spacing
You can adjust the space below each section.
- Select the section on the canvas
- In its settings panel, use the Spacing control
- Values are in pixels
Embedding Your Form
After you've built your form, you can embed it on your website by following these two steps.
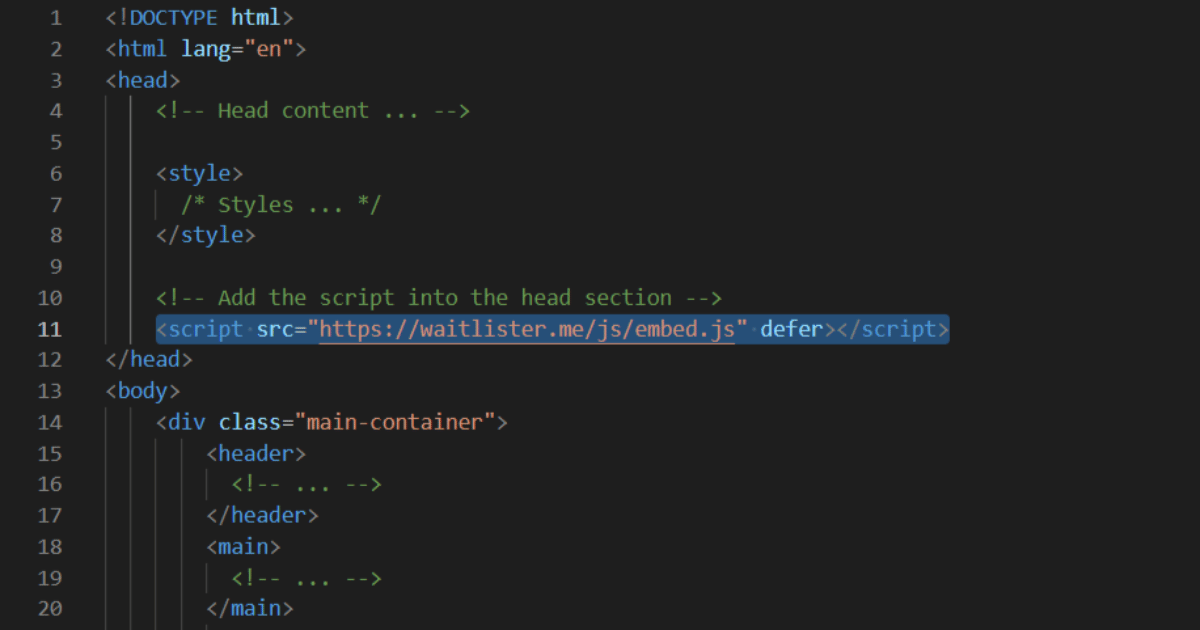
1. Add Script to Head
First, add the Waitlister embed script to your website's <head> section.
<script src="https://waitlister.me/js/embed.js" defer></script>
The script is the same for all forms.
2. Add Form Container
Next, add the div container with your unique waitlist key where you want the form to appear.
<div
  class="waitlister-form"
  data-waitlist-key="YOUR-WAITLIST-KEY"
  data-height="400px"
></div>
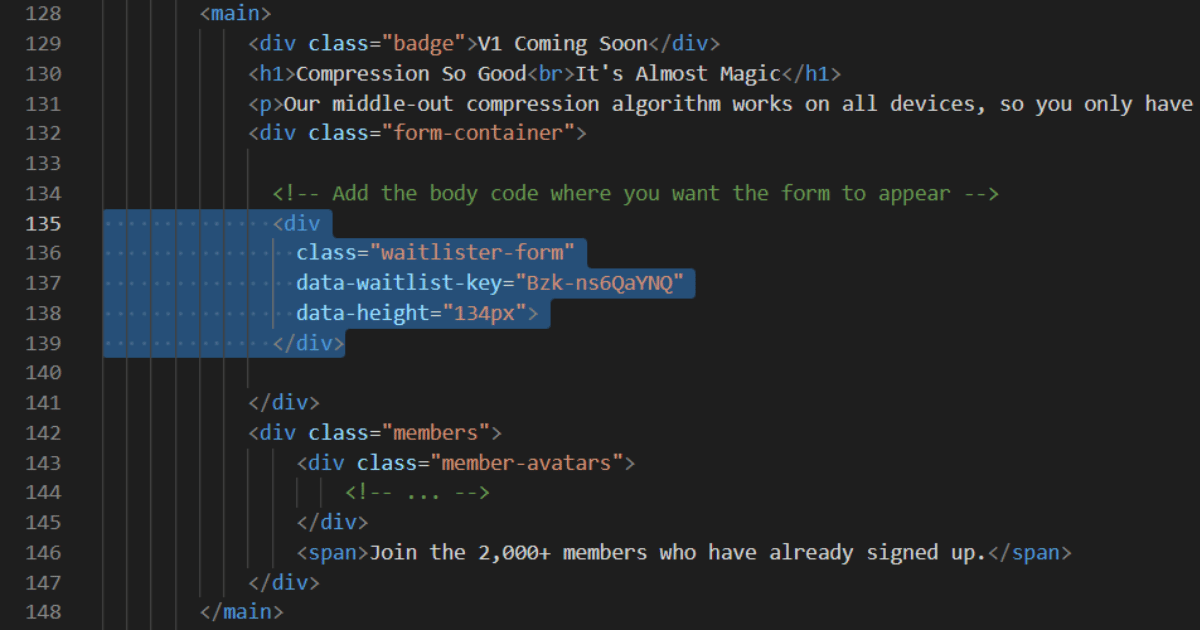
You can get the code that includes your waitlist key by navigating to the "Form" page in your dashboard and clicking the "Embed" button.
To find your waitlist key at any point, navigate to the "Overview" page in your waitlist dashboard.
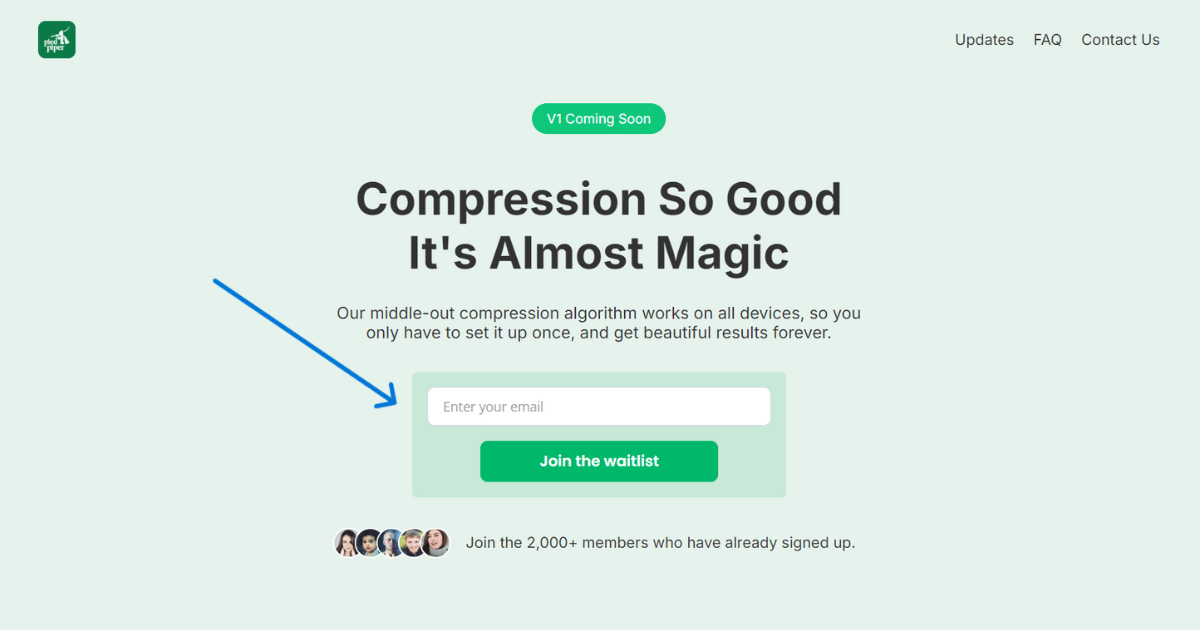
3. Your Form is Ready
You will now see the waitlist form in your website, and it's ready to start accepting sign-ups.
Customizing Height
The initial form height is automatically calculated based on estimated height. It will also automatically adjust if your form's content needs more height.
But, if needed, you can always adjust it yourself by changing the data-height attribute.
For example, to make the form taller:
<div
  class="waitlister-form"
  data-waitlist-key="YOUR-WAITLIST-KEY"
  data-height="600px"
></div>
Help and Support
Need assistance with waitlist configuration? We're here to help.
- Contact us via the public contact form
- Access the "Help" page in your account dashboard