
Features
Welcome Emails
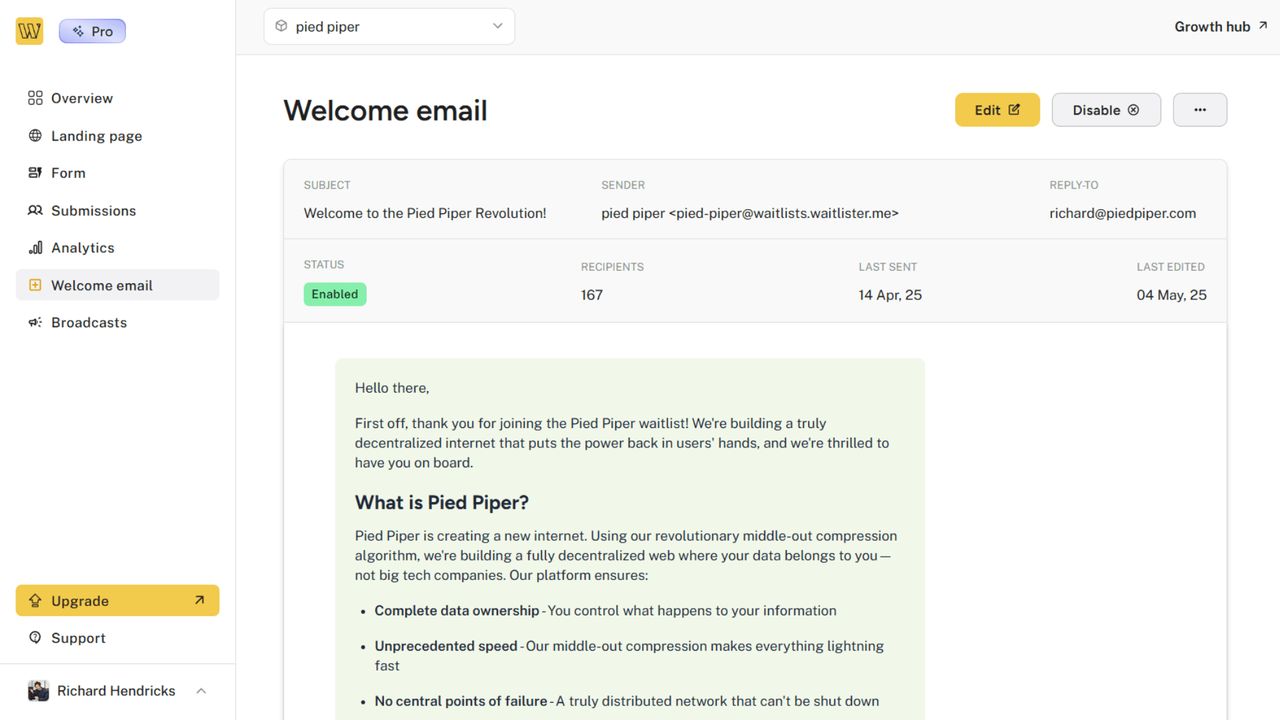
The welcome email feature allows you to automatically send a personalized email to new subscribers as soon as they join your waitlist. This is a powerful way to immediately engage with potential users, set expectations, and build anticipation for your product launch.
Welcome emails are available on the Launch plan and higher.
Getting Started with Welcome Emails
Accessing the Welcome Email Feature
- Navigate to your waitlist dashboard
- Click "Welcome email" in the sidebar navigation
- You'll see the current status and configuration of your welcome email
When first accessing this feature, a default welcome email template will be available for you to customize.
Configuring Your Welcome Email
The welcome email editor provides you with control over the content and appearance of your email.
Basic Settings
When editing your welcome email, you'll need to configure several important settings.
- Sender Name: The name that will appear as the sender in recipients' inboxes
- Sender Email: The email address that will be used to send the welcome message
- You can use your default Waitlister domain
- On the Growth plan and higher, you can also send from a verified custom email domain
- Reply-To Address: An optional email address where replies will be directed (if different from the sender)
- Subject Line: The subject of your welcome email
Email Content
The block editor lets you design professional-looking email content visually.
- Blocks: Stack text, image, button, divider, spacer, and custom HTML blocks — hover between blocks and click the + button to add one, and select any block to edit its content and styling in the sidebar, or start from a prebuilt template
- Design Settings: Set the email's background colors, content width, font, and link color once for the whole email
- Template Variables: Insert personalized elements like the subscriber's name, referral link, or position in the waitlist from the text toolbar
- Device Preview: Toggle between desktop and mobile views while you design
Your design is compiled to email-safe HTML when you save, so what you see in the editor is what lands in your subscribers' inboxes.
Welcome emails created with the previous editor keep sending exactly as they were. Open yours in the builder and click "Adapt to blocks" whenever you want to edit it with the new editor.
Managing Your Welcome Email
Once you've configured your welcome email, you can manage it from the welcome email dashboard.
Preview and Testing
Before enabling your welcome email, you can check exactly how it will appear to subscribers.
- The welcome email dashboard shows a live preview of your email as it will be delivered
- Click "Send test" to receive the email in your own inbox, with template variables filled in with example values
Enabling and Disabling
You can easily toggle the welcome email functionality on or off.
- When enabled, all new subscribers will automatically receive your welcome email
- When disabled, the email will not be sent to new subscribers
Troubleshooting
Email Not Sending
- Verify that the welcome email feature is enabled
- Check that your sender email is properly configured
- Make sure your account has at least the Launch plan activated
Poor Deliverability
- Avoid spam trigger words in your subject and content
- Keep your email size under 102KB for optimal delivery
Display Problems
- Test on multiple devices to ensure responsive design
- Avoid overly complex HTML that might not render correctly
Help and Support
Need assistance with your welcome emails? We're here to help.
- Contact us via the public contact form
- Access the "Help" page in your account dashboard